We use cookies to make your experience better. To comply with the EU GDPR e-Privacy directive, we need to ask for your consent to set cookies. Learn more.
How to Save Old Flooring
In any restoration project, existing solid wood floors are always worth trying to save. The character they provide is always significant and it is something that cannot always be easily replicated with new wood. Of course there are some excellent engineered wood floors out there and you can always buy second-hand or reclaimed antique floors but nothing compares to successfully conserving a room’s existing floor and the reward of restoring its former glory.

Crimes against flooring

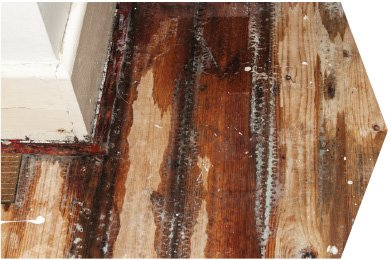
Unfortunately, antique wooden flooring has been the victim of a brutal campaign of attacks over the years and you would be amazed at the violence meted out in the form of zealous varnishing, ugly wood staining, outright neglect, water damage, thoughtless mopping, asbestos surveys, damp inspections, electrical rewiring and carelessly installed central heating systems. Beautiful Victorian pitch pine parquet and Georgian oak have also typically been subjected to the vagaries of changing domestic fashions. Despite adding significantly to the character of a property, and to its financial value, they have found themselves smothered by shag pile carpets or vinyl flooring! (The shame of it!)
- TIP - Unless you really know what you’re doing, it’s best not to use heavy sanding equipment like belt-drum sanders. Professional conservators generally don’t use them as they are too harsh.
Off With The Old
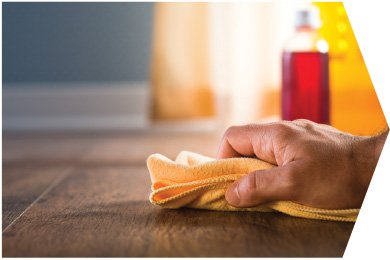
When you first start to really scrutinise an old solid wood floor, you will often be struck by just how dirty it really is. Antique flooring will usually have a natural sheen generated by years of wear called a patina. They can also have years of ground-on dust and grime, as well as inches of varnish that hides the true colour of the wood beneath and its natural grain.
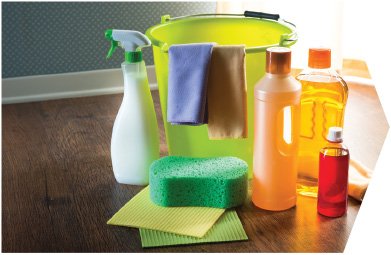
Start by carefully cleaning over the surface in small circles with a dry cloth and a small amount of white spirit. This will lift a huge amount of the dirt off and it’s always surprising at just how much will easily leave the wood with each application. You’ll have a completely black cloth in no time (and black hands as well probably). Take your time though as the more you can lift off at this initial stage, the clearer and cleaner the final finish will be.
Sand-da-Floor
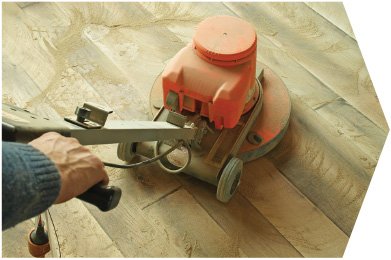
Once cleaned you will probably need to undertake some sanding. It’s always a tough decision to foresee how much sanding a floor will need and whether to even take a sander to your beloved floor or not. Don’t rush it – take your time. If you decide to sand, do so sparingly. Once you start you may decide that just a light sanding will be enough to take it back to the natural wood underneath before applying the new treatment.
Try on a small corner of the floor to gauge how much you think will be needed. Any oils or waxes already on the wood will probably need going over with steel wool to encourage them off the surface. Old paint can be taken off quite easily using a suitable chemical remover but again make sure you read the instructions carefully as some can be very strong and need careful timing.
- TIP - Just sanding the boards without first removing as much of the old treatments as possible can actually soften the old finish so that it will soak further into the grain of the timber. It will also make it harder for the fresh varnish to ‘grip’.
Varnishes, Lacquers and Polish
It is extremely common for homeowners to have used the incorrect cleaning products and polish on a timber floor, slowly damaging their prized possession. There is a huge number of wood polishes on the market but most will not suit an antique wood floor so make sure you choose the right one for your wood type. There are lots of really good resources out there including step-by-step Youtube videos that take you right through the process.
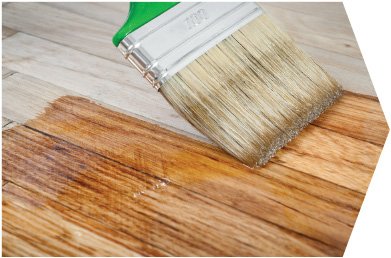
Understanding what you are applying is key to getting the results you want as a good varnish, properly applied, will protect the wood for years and prevent dirt, grease and water from penetrating the wood. They also come in varieties of finishes including matt and gloss, allowing you even more choice over the final look. Make sure you get one specific for antique wood, which are aimed providing a deep wax finish and not just a surface polish. Some of the best include Behlen’s Blue Label Paste; Butcher’s Boston Polish and SC Johnson Paste Wax.
Using cheaper, modern lacquers and polyurethane varnishes can give the wood an orangey colour, which doesn’t suit antique wood floors and should be avoided. Some varnishes can also have a high gloss content, which can yellow the wood so it’s really worth taking the time to research the right product for you. When first applied, especially to bare wood, it is often best to thin a varnish down and make sure you let it dry overnight before continuing.
Lacquering the wood really is not as popular these days and sits right at the end of the toughness scale and really is only for areas where very heavy foot traffic is expected (maybe a public building rather than a home). Lacquering the wood creates a very hard coating that sits on top of the wood, rather than absorbing into it, and is more resistant to water.
- TIP - Old varnish will quickly transform into a sticky goo when you lift it off. Use a paint scraper to take it off the wood and scrape it into an old paint tin.
Wax On, Wax Off
Once the floor is cleaned and prepped, use a natural wax to bring out the floor’s natural shine and colour. The choice of wax to use is usually best chosen by how much wear and footfall it’s going to be subjected to. For very high traffic areas such as hallways, a polish with a high amount of carnauba, a much harder-wearing wax that is derived from the Brazilian carnauba palm, is definitely the best option but needs to be mixed with beeswax. For lower usage areas, beeswax on its own is usually fine.
Treating Humidity Damage
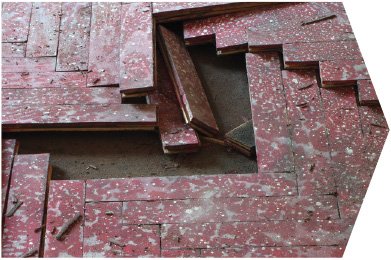
Heat and moisture are not the friends of wooden flooring and ‘cupping’ occurs when the wood gets too dry or too wet. It starts to bend at the ends or edges. It is caused when the ambient humidity is different on top from below, usually caused by damp from a faulty damp course, leak, or inadequate drying of the concrete sub-floor. People usually attack this problem by sanding out the warped ends without actually addressing the damp problem. This, of course, doesn’t fix the long-term problem and often leads to new issues. Also, if you’ve got damp under the floor then you have bigger issues to deal with and damage to repair.
- TIP - Don’t forget a parquet clamp. They can be really helpful to fit the first rows of any new or repaired floor.
Shrinkage and Gaps
Humidity and temperature difference can also lead to gaps appearing, particularly around radiators where there are significant temperature changes. Where gaps affect the performance and let drafts in you can fill in the gaps with purpose-cut slivers of wood that slot into the space, however it can detract from the overall look of the floor if the colouring doesn’t quite match. The more time-consuming option is to carefully lift and relay the boards, filling in any gaps at the side of the room in less conspicuous corners, preferably using similar timbers. This is far more effective and aesthetically pleasing.
And finally… If you are unsure about how to treat your floors, always seek professional advice. There are some really good experts out there who regularly post great blogs on saving old flooring.
Where to pick up antique
wood flooring or off-cuts:
- Reclamation yards
- Timber merchants
- Auction houses
- Online auctions
