We use cookies to make your experience better. To comply with the EU GDPR e-Privacy directive, we need to ask for your consent to set cookies. Learn more.
How to Install Underfloor Heating
Widely used in Scandinavia where outside temperatures are regularly freezing, underfloor heating is increasingly being viewed in Britain as a cost-efficient method of heating various rooms within a house where a comfortable temperature might be difficult to maintain, such as a kitchen or bathroom. The fact that is invisible and does not affect the clean-lined look of a room in the same way that a radiator would, in addition to lack of maintenance and care it needs in order to work effectively, also makes it an attractive option for homeowners.
Underfloor heating is not a difficult thing to install yourself, as long as you have some basic DIY experience and the time to complete the job in one go, rather than pulling up the floor and then having to leave it for a week. You can do the bulk of the initial work, but you will probably need an electrician or plumber, depending on the system you opt for, to connect the system to the mains.
Types of underfloor heating
There are two main types of underfloor heating for homeowners to choose between: wet or electric. Wet underfloor heating systems use warm water to create the heat, sourced from the central heating system, while an electric system uses coils powered from the mains.
WET
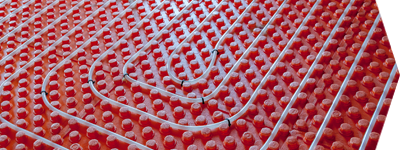
Wet heating systems see water pumped through pipes that are laid on the subfloor under the top surface of the floor. The system reduces the cost of water heating compared to systems that involve radiators, as it needs the water to be heated at a lower temperature to work effectively.
Wet heating systems are most easily installed where the floor can be pulled up and then put back into place – for this reason, it may be best suited to extensions or new builds. For the same reason, it may be best to restrict this type of system to ground floor rooms, but upper levels are certainly not off-limits.

ELECTRIC
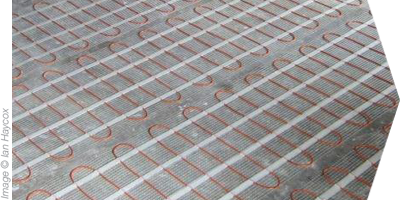
Underfloor heating systems powered by electricity take the form of coils attached to or embedded into mesh mats that are rolled out and connected together underneath the floor. They are then linked up to the thermostat and the mains power supply so that they can be used. They are cheap to install, but will cost more to run than wet systems, so they may be more suited to small rooms or areas.
How to install
PRE-INSTALLATION
Regardless of the type of underfloor heating system you choose or the type of floor you are installing it under, you should ensure that the rooms you're going to install it in are properly insulated so that the effect of the heat is not immediately negated. Ensure that the subfloor is clear of debris before you begin and that the joins between the insulation material are taped to prevent a loss of heat or screed (if you're using it) through them.
Insulation materials must be present below the system to prevent the heat escaping through the subfloor and foundations, and if you're installing an electrical system, you will need to make an appointment for a qualified electrician to visit in order to connect the system to the mains.
Otherwise, the methods for installing underfloor heating of both types under hardwood and laminate floors are very similar.
Installing a wet system
As already noted, a wet system tends to be more problematic to install than an electric system because of the general complexity of the system and because of the fact that it often means that the floor of the room has to be raised to accommodate it. Electrical systems are more compact and the raising of the floor (if required at all) will be minimal.
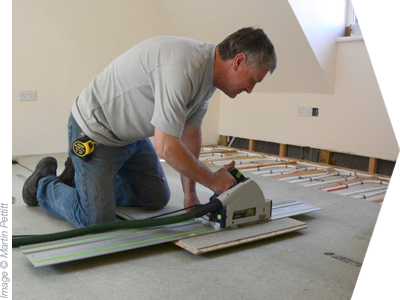
1. PULLING UP THE FLOOR
- The way in which you pull up the floor will depend on the placement system it utilises – most fall under the category of either tongue-and-groove or click in terms of the way the planks lock together.
- Tongue and groove flooring is nailed down through the tongue to connect the boards together, so the nails have to be pried out with a crowbar or similar tool to free the boards up. Begin (having removed the perimeter trim) with the row of the boards closest to the wall with top nails visible and ensure that you lever the crowbar against the subfloor once the first board has been removed if you want to reuse the flooring – this will avoid damage.
- Click flooring, often employed on laminate boards, is designed to be easy to put together, so it should be easy to reverse the process and remove it. Find the point at which the installation ended (usually a corner board) and pry that up. You can then go along the entire row adjacent to the wall and remove it in an entire piece, separating the individual boards by flipping them over and unclicking them from the bottom.
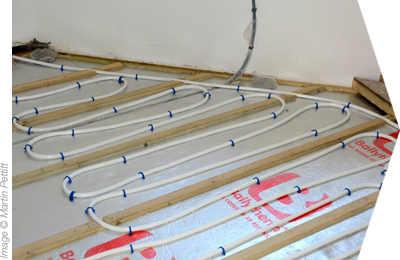
2. LAYING THE PIPES
An underfloor heating system should come with a guide, at the very least, that will enable you to ensure that you don't lay the pipes wrongly and end up running out of them before the desired area has been covered. If you have to create bends in the pipes yourself, you should be able to do it by hand, and whether you lay them in a spiral or from left to right across the room should depend on the manufacturer's instructions. Ensure that they are spaced evenly so that the heat spreads evenly when the system is in operation.
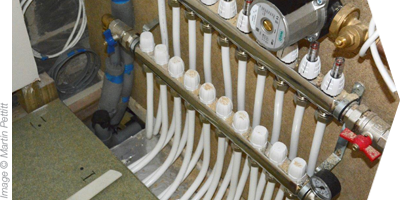
When positioning the manifold (where the system will be connected), fix it to the wall as close to the circuits as possible so it can be plumbed in the same way as a radiator. However, the final connection of the system to the main water supply and central heating network should always be performed by a qualified and experienced plumber unless you're completely confident in your ability to do it yourself.
One common problem that can occur at installation is the presence of air in the loops – this occurs when they are not flushed properly prior to being used for the first time. Each loop needs to be flushed individually by opening the valve that connects it to the manifold to ensure that no air is present in it.
3. SCREED
Wet underfloor heating systems tend to be covered in a layer of screed that assists with insulation and helps the heat generated to be felt more quickly. There are two forms of screed that might be used: a semi-dry trowelling screed and a fast-flowing liquid screed that can be pumped over the heating pipes to a prescribed depth. Consult with an expert to ascertain which type of screed you should lay, and how deep it should be.
Ensure that the pipes are securely fastened and that the insulation is lying flat on the subfloor before applying the screed. Because it is rendered useless if it develops a crack, and it will be expanding and shrinking in accordance with the heat, expansion joints must also be installed to facilitate that movement. Once laid, the screed must be allowed to dry naturally (which shouldn't take more than seven days) before the heating system is turned on.

Installing an electric system
An electric system sounds as though it should be relatively easy to install, given that it comes in the form of mats that need to be positioned underneath the areas to be heated. However, nothing that involves electricity is ever simple, and you should ensure that you take extra care in ensuring that the installation goes smoothly.
1. PULLING UP THE FLOOR
- The way in which you pull up the floor will depend on the placement system it utilises – most fall under the category of either tongue-and-groove or click in terms of the way the planks lock together.
- Tongue and groove flooring is nailed down through the tongue to connect the boards together, so the nails have to be pried out with a crowbar or similar tool to free the boards up. Begin (having removed the perimeter trim) with the row of the boards closest to the wall with top nails visible and ensure that you lever the crowbar against the subfloor once the first board has been removed if you want to reuse the flooring – this will avoid damage.
- Click flooring, often employed on laminate boards, is designed to be easy to put together, so it should be easy to reverse the process and remove it. Find the point at which the installation ended (usually a corner board) and pry that up. You can then go along the entire row adjacent to the wall and remove it in an entire piece, separating the individual boards by flipping them over and unclicking them from the bottom.
2. LAYING THE MAT
Once the floor is out of the way and the insulation is laid, rolling the mats out in the areas you'd like to heat is a relatively simple task. Simply secure them in the way the manufacturer suggests – some employ doublesided sticky tape, for example.
You will also have to fit a floor sensor that connects to the thermostat so that you can tell what temperature the floor is running at. The floor sensor should sit on the floor close to the wall below the thermostat, taped or fastened in place to provide a correct reading every time the thermostat is consulted.
The final connection of the system to the main electrical supply should always be performed by a qualified and experienced electrician. This ensures that any immediate issue you come across will likely be down to something like a faulty wire or connection, rather than a mistake made during the installation process.
3. SCREED
Electric underfloor heating systems are sometimes covered in a layer of screed that assists with insulation and helps the heat generated to be felt more quickly. There are two forms of screed that might be used: a semi-dry trowelling screed and a fast-flowing liquid screed that can be pumped over the heating pipes to a prescribed depth. Consult with an expert to ascertain which type of screed you should lay, and how deep it should be.
Ensure that the pipes are securely fastened and that the insulation is lying flat on the subfloor before applying the screed. Because it is rendered useless if it develops a crack, and it will be expanding and shrinking in accordance with the heat, expansion joints must also be installed to facilitate that movement. Once laid, the screed must be allowed to dry naturally (which shouldn't take more than seven days) before the heating system is turned on.
After the installation
The two most common problems associated with the two systems have been covered already: air in the pipes of a wet system and faulty wiring in the electric system. Once the installation is complete, allow the screed to dry as instructed before turning the system on, as this might damage it and cause cracks to develop.
Otherwise, there is little aftercare that needs to be done to either type of heating system – this is one of the factors that make them such an attractive heating option. If the system stops working suddenly, contact the manufacturer, who may recommend that an electrician or plumber comes to look at it if the problem has nothing to do with the product itself.

And finally...
Whichever underfloor heating system you opt to install, the initial setting-up of it should be a simple task once you understand everything that's involved in the process. The instructions provided by the manufacturer the system has come from will enable you to lay the pipes correctly once the floor has been removed, and then you should be able to avoid most of the problems suffered by new installations by having the relevant technician perform the final connection and testing. This will enable a faster operational system.
Follow the handy steps and tips found throughout this guide, and your feet (and everything else) will stay toasty throughout the year!
